Divers FAQ's
Think Like a Diver
Got Questions?
We’ve got your Back!
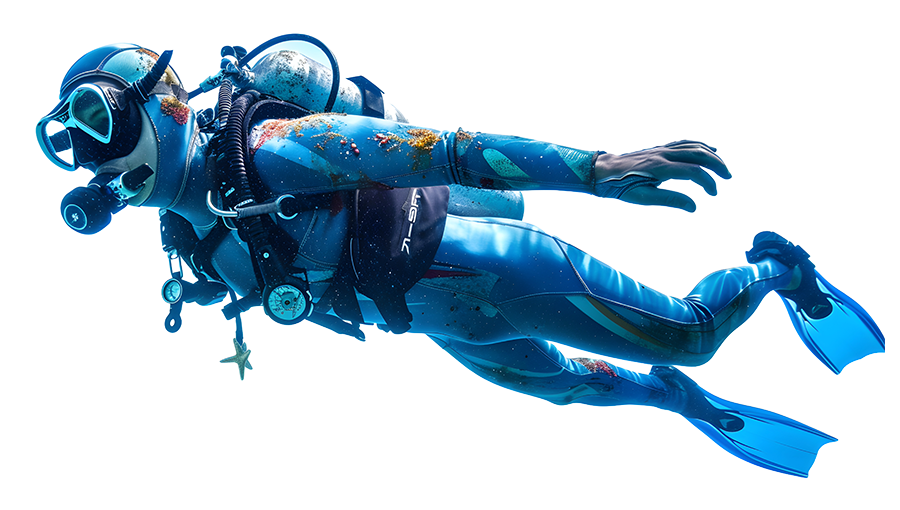
Where women dive with style & confidence….
At our premier diving center, we believe every woman deserves a safe, elegant, and empowering experience beneath the surface. Our FAQ section is designed specifically for divers who value professionalism, high-quality training, and a touch of luxury in every adventure. Whether you’re preparing for your first certification or seeking advanced, boutique-style dive experiences, this guide provides clear, expert-backed answers to the questions most commonly ask. From safety standards and equipment tailored for divers fit to curated dive trips and personalized instruction, we’re here to ensure you feel confident, informed, and inspired before every dive. Explore the answers below and discover why women from around the world trust us for their most unforgettable underwater moments.
Think Like a Diver
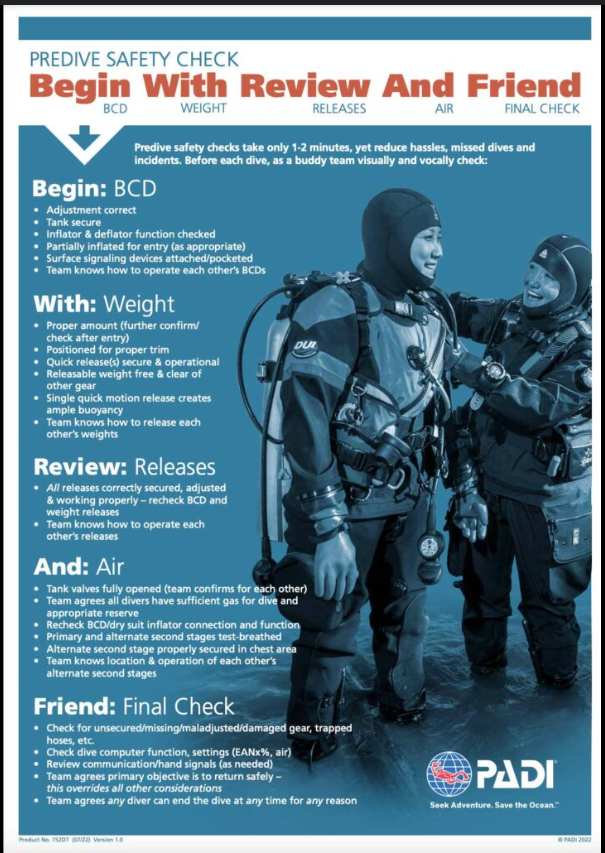
The buddy check, which has been given the acronym BWRAF, is an important accident prevention procedure new divers learn during the PADI Open Water Diver course. As divers gain more experience, the buddy check is often reduced to one diver asking the other, “You good?” Yet, a simple “you good” is not enough when it comes to adventure sports. It’s a sad fact that diver error is a leading cause of scuba diving accidents.
According to DAN, accidents are just as likely to happen to new divers compared to those certified for several years. Let’s build habits and remind each other that it is much easier to fix a small problem above water than to deal with a big problem underwater.
But how do you remember the proper buddy check procedure? Most new divers learn a mnemonic device to remember BWRAF, such as “Begin with Review and Friend”, to remember the steps in a buddy check (BWRAF). There are many other ways to remember the acronym, but we’ll get to those in a moment. First, here’s a quick review of how to do a proper buddy check.
When to Conduct a Buddy Check?
Before every dive. It’s important to note that if you are making more than one dive in a day, it’s not enough to simply make a buddy check before the first dive. After each surface interval, and before you enter the water for your next dive, you will need to make a thorough buddy check.
BWRAF
Below, we’ll detail what each letter of BWRAF stands for and how to perform that section of the buddy check. The steps should be completed in the following order:
B – BCD/Buoyancy
Make sure everything is connected and functioning. Test the inflator button and all the deflate valves (including the overpressure release valve). Dry suit divers should check that they have attached their dry suit inflator hose securely to the valve, check that it is working properly and then check to ensure their deflator valves vent air properly.
It’s important to know how to adjust your buddy’s gear. If you’re unfamiliar with their equipment, ask questions. In an emergency, you’ll be glad you did.
W – Weights
Ensure both you and your buddy have weights and that all weights are secure. If a BCD has integrated weight pockets, give a gentle tug on BCD weight pouches to confirm they’re locked in and won’t fall out during entry. Then, if applicable: check weight belts, rear BCD weight pockets, and any other places where weights may need adjustments. If your buddy is wearing a weight belt, ensure that it is set up for a quick release.
R – Releases
First, check all your releases and fastenings to confirm they are secure. Then, tell your diving partner how to open the releases if needed in an emergency. Do the same checks on your dive buddy. The most common releases are – tank straps, shoulder and chest straps, and belly straps. (Check to make sure there aren’t any hoses or other items positioned in a way that might prevent a diver from getting out of their equipment in an emergency.)
A – Air
Don’t skip this step! Taking a quick breath or two off the regulator isn’t enough. A proper air check means verifying the cylinder valve is completely open by This ensures the tank valve is open, the air is available for the dive, your monitoring gauge is working, and the air tastes and smells okay. Also, recheck the BCD and dry suit inflator connection and function, and check that the alternate second stage (regulator) is properly secured in the chest area, making sure your buddy knows where to locate it in an emergency.
Note: If you or your buddy are diving with nitrox, you should have analyzed your tanks prior to kitting up.
F – Final Check / Final Okay
As part of the final check, gather your remaining items of gear (mask, snorkel, fins, dive light, dive knife, camera, audible and visual signaling device, etc.). Be sure to secure loose hoses and other objects that may dangle and damage the reef. Lastly, do a head-to-toe check to ensure both you and your buddy are ready to go.
The steps described above are a generic, quick review for divers using an open circuit system. If you’re diving technical or rebreather, you should conduct safety checks appropriate to that diving procedure.
Become a Rescue Diver to be more prepared!
Babies With Rashes Are Fussy
Barf Will Really Attract Fish
Barry White Records Are Funky
Beans With Rice And Fish
Breathing Water Really Ain’t Fun
Bruce Willis Ruins/Rules All Films
Big Whales Really Are Fast
Burgers With Relish And Fries
Big White Rabbits Are Fluffy
Being Wary Reduces All Failures
Because We Really Are Friends
Because We Really Ain’t Fish
The Value Of BWRAF
As divers, safety is our number one priority. Safety first for ourselves, then for other divers, and even the safety of marine life and coral reefs. Because we can all make mistakes, following BWRAF as a buddy check can prevent equipment problems and human errors. According to DAN’s 10 Ways to Prevent Scuba Diving Accidents, five out of 10 scuba accidents likely could have been prevented by a pre-dive buddy check. Checking your equipment and your buddy’s is vital to safety underwater, so don’t forget to do a buddy check before each and every dive!
Common Mistakes Divers Make with BWRAF
Rushing through the safety check – We get it, you’re excited to jump into the water! However, to ensure a fun and safe dive, it’s crucial for all divers to properly execute the full pre-dive safety check. This means taking a few minutes to properly follow every step of the BWRAF check.
Ignoring minor equipment issues – A lightly cracked dive computer or a broken mask seal may seem like no biggie on the surface. But once you begin your descent, these minor equipment issues can cause serious discomfort and potentially fatal equipment malfunctions. If you notice anything less-than-perfect during the BWRAF check, make sure to remedy it before beginning your dive.
Not communicating with their buddy – Some divers may be nervous when diving with a new buddy. but the BWRAF check is an excellent way to connect over trusting your buddy to check your equipment setup. Divers should encourage each other to vocalise what they observe during each step. Such as “I can see your weights are nice and secure, let me give them a gentle tug to make sure they won’t come loose”.
Not checking airflow thoroughly – As we covered earlier, taking a few breaths out of the regulator is not enough to adequately check airflow in the equipment. During the buddy check, you must follow all the steps, including breathing from the primary and alternate second stages while looking at an SPG or air-integrated computer. additionally, checking the inflator hose, and the alternate inflator hose.
Get Prepared with PADI Rescue Diver
PADI offers two courses, in particular, that help a diver to be more prepared for emergency situations in and out of the water. These are the PADI Rescue Diver course and the Emergency First Response (EFR) Primary and Secondary Care course. To take the PADI Rescue Diver Course, you’ll need to be an Advanced Open Water Diver (or an Adventure Diver with a completed Navigation Dive). The Rescue Diver course prepares you for most situations that can occur on the surface and underwater. After completing this course, you’ll be able to assist during an emergency until help arrives. The EFR course is a prerequisite for the Rescue Diver course, but it’s also extremely useful by itself. Upon completion of the EFR course, you’ll be certified in CPR & AED use, as well as primary and secondary care.
Ready to Take Your Education Further?
When you think about it, BWRAF is just like the other processes you do every day. Think about the checklist you go through before leaving your home – filling up your water bottle, taking a jacket, grabbing your phone, wallet, keys, etc. You’ve developed this procedure to ensure you’re prepared to deal with whatever situation may arise while you’re away. Whether you’re leaving home for the day, or leaving the topside world for the underwater one, it’s important to be prepared. Doing a buddy check can help make sure your dive is about having fun rather than dealing with problems.
There’s one important rule we haven’t talked about: respect for marine life and the environment. Some phrase it as, “Take only pictures, leave only bubbles.” Others may say, “Do no harm, leave no trace.” Regardless of how you put it, every diver must remember they are merely visitors to the underwater world and show the utmost respect.
There are also a few safety rules every diver should follow. These aren’t PADI certification rules (although you will learn to do them in PADI courses); they are general dive safety rules based on years of research:
Do a buddy check before every dive
Always make a 3-minute (minimum) safety stop
Don’t exceed a safe ascent rate
Follow DAN’s guidelines about flying after diving
If you don’t remember what BWRAF stands for, the depth for a safety stop or what a safe ascent rate is, it might be time for a scuba refresher.
Diving has a great safety record when you dive responsibly, following the rules and regulations. That’s the whole reason they exist, after all — to keep you healthy and whole and ready to dive again the second you finish your surface interval. Whether you’re still learning to dive or have a lot of experience, implementing these ten safety precautions will reduce your risk when you’re underwater.
1. Make a Safety Stop
When is a safety stop required? Divers should make a safety stop at the end of every dive at a depth of 15 feet for three to five minutes. Safety stop diving gives your body extra time to release excess nitrogen that builds up in your system during the dive. Deep technical dives commonly require deeper and longer decompression stops, but three to five minutes at 15 feet is standard for recreational dives within no stop dive limits.
2. Control Your Ascent Rate
You don’t want to rocket toward the surface for a few reasons. First, your body needs time to release dissolved nitrogen (hence your safety stop). Second, since air expands while rising through the water column rapidly, air expanding in your lungs as you ascend too quickly increases the risk of lung overexpansion injuries like air embolism. And, to control your ascent rate, control your ascent rate. That is, as air in your BCD, dry suit or wetsuit material expands, you become more buoyant and your ascent rate starts to accelerate. When you’re ascending slowly, you can easily release air from your BCD/dry suit to keep your buoyancy and ascent rate under control. But if you ascend rapidly, it’s harder to compensate fast enough, leading to a “snowball” effect of more increasing buoyancy and ascent speed. Learning how to ascend when scuba diving is one of the most important diving rules.
Want to be a safer diver? Become a Rescue Diver through PADI.
3. Keep Breathing
Continually breathing when submerged protects your lungs from lung overexpansion injuries. This is not important just during ascent, but throughout the entire dive. Not only does this reduce your risk in case you’re ascending and don’t realize it for some reason (rare, but it happens), but you’re developing and maintaining the right habit.
4. Watch Your Gauges
Your gauges, or dive computer, constantly tell you important information like how deep you are, how long you’ve been down, how much air and no stop time you have left, which way is north and so on. Check these frequently to ensure you’re staying within your dive plan. Your air consumption especially can change not only from day-to-day, but within the dive depending depth, current, exertion, stress, body temperature and a host of other variables. Don’t assume a certain fill will give you the same bottom time as a previous dive. Check your air levels often – every few minutes at the most – and turn the dive so you surface with at least 500 psi reserve.
##5. Stick with Your Buddy Diving is not a solo sport. “Buddy diving is a potentially life-saving practice for scuba divers,” according to DAN’s 2019 report on dive fatalities. “Properly implemented, it helps to prevent accidents and to avert bad outcomes of possible incidents. Buddy diving starts with sharing the dive plan, getting familiar with each other’s equipment, pre-dive buddy check, keeping an eye on each other during the dive, sticking to the plan, returning to the surface together, and conducting a post-dive debrief.” Statistics and research repeatedly support that the buddy system reduces risk.
6. Dive Within Your Training
With the exception of being under instruction with a professional instructor, never attempt a dive beyond your training, whether that’s visiting a wreck deeper than you’re certified to go or entering a cave system without taking a rigorous cave diving class. Training is vital to knowing how to handle different underwater environments. You can always take classes to advance your dive repertoire by learning the skills you need to penetrate a wreck, dive deep, explore a cave or dive high in the mountains, but don’t try to learn them by yourself.
7. Dive Within Your Limits
Diving within your limits differs from diving within your training — personal limits change from day to day and year to year. You may be qualified to dive to 100 feet, but if you haven’t been diving in a few years, jumping straight into a dive that deep likely isn’t the best plan. Or, if not quite in your usual fitness due to not exercising for a few weeks, a rough shore dive with your local club may be off the table until you’re back to yourself. You can always make it a goal to work up to your old limits, but, as life changes, respect your evolving boundaries.
8. Ensure You Equalize
Understanding how fast you can descend when scuba diving is crucial. Do not keep descending if your ears hurt. Diving isn’t supposed to hurt, and doing so can cause serious and lasting damage, such as a ruptured drum or worse, which can permanently impair your hearing and exclude you from ever diving again. If you are struggling to equalize, signal your buddies (they can’t know your ears hurt unless you tell them) rise slightly to a shallower depth and try again. If the pain continues, call the dive. Never, ever “force it.”
9. Do a Pre-Dive Safety Check
Looking over your gear and buddy’s gear (and having them do the same) is a good way to catch small issues that can become a big deal underwater. Look for open valves, full cylinders and properly secured releases, as well as things like loose weights that could fall and trigger a rapid ascent. Test breathe second stages and test inflators/deflators to be sure they’re working properly. This process also acquaints you with your buddy’s gear in the event there is an emergency in which you need to assist.
10. Remember Your Objective
The primary objective of every dive is for everyone to come back safely. Do not let secondary objectives, like photographing a certain species or seeing a specific part of a wreck, get in the way of remembering your primary objective. Even if you “only need a minute” to get that “perfect shot” but you’re at your turn pressure, skip the shot and turn the dive knowing you’re fulfilling the dive’s main objective.
1. Flying After Diving
Flying after scuba diving is one of the more widely known risks to divers. This issue comes up frequently in the diving world, because divers want to take full advantage of their vacations and also get the most diving time in while they can.
The main reason divers should avoid flying immediately after diving is the pressure inside the airplane’s cabin. The air pressure inside the cabin lessens as you reach altitude. When you’re flying in a plane right after diving, the increase in altitude results in a drop in pressure which is similar to a fast ascent while diving.
The longer and deeper you dive, the more nitrogen is absorbed into your blood and tissues. Upon returning to the surface, the ambient pressure reduces, and the nitrogen reverts to gas bubbles, which can be very dangerous when inside the body.
Decompression needs to be done slowly, so the nitrogen can safely pass back out through your lungs. If you ascend too quickly, the nitrogen can form bubbles in your blood or tissues, which can be painful and possibly fatal. The resulting condition is known as decompression sickness (or ‘the bends’).
Waiting the correct amount of time before flying will reduce the nitrogen in your body. As a general recommendation, leave a 24-hour surface interval before flying after doing any type of diving. This rule covers all types of dives and adds extra time as a safeguard for peace of mind.
Flying After Diving Guidelines from Divers Alert Network (DAN)
The following DAN guidelines apply to air dives followed by flights at cabin altitudes of 2,000 to 8,000 feet (610 to 2,438 meters) for divers who do not have symptoms of decompression sickness (DCS):
For a single no-decompression dive, wait at least 12 hours before flying
For multiple dives per day or multiple days of diving, wait at least 18 hours before flying
For dives requiring decompression stops, wait at least 24 hours before flying
In addition, you should wait longer if directed by the no-fly time indicated on your dive computer. To err on the side of safety, many divers plan a 24-hour surface interval before flying after any type of diving and spend this time resting or exploring topside attractions. However, keep reading to be aware of some other activities you should avoid doing straight after scuba diving.
2. Mountain Climbing or Driving
It may surprise you to discover that driving or hiking to the top of a 10,000-foot (3,048-meter) mountain puts you at the same risk for decompression sickness (DCS) as flying in an airplane. Cabin pressure in an average commercial jet is equivalent to being at 6,000 to 8,000 feet (1,800 to 2,400 meters) above sea level. If simulated altitude puts you at risk for DCS, being at altitude is also high risk. That said, people do dive at altitude and there are special dive tables to follow. This type of diving is called altitude diving.
You should avoid mountain climbing in the first 24 hours after a dive. If you are planning to combine mountain climbing and scuba diving on the same trip, go mountain climbing first to minimize any potential decompression sickness risk. It is better to go climbing before a dive, and this is an easy solution to reduce risk from a DCS perspective. Just be mindful of other factors that could affect your fitness to dive, such as exertion and fatigue so be sure to rest and hydrate after your climb or hike and before you go diving.
In the same way, if your journey home involves driving to altitude after diving, you should allow a sufficient surface interval to reduce the risk of decompression sickness (ideally 24 hours)—or choose an alternative route.
3. Ziplining After Diving
Ziplining as an activity is fine. Again, the concern is going to altitude after diving. It is recommended to confirm the altitude of your ziplining destination before you book.
Ziplining usually occurs on a mountain or elevated area and should be avoided for 24 hours after a dive due to the altitude. This helps reduce the risk of decompression sickness (DCS) and enjoy your ziplining worry-free.
Other High-Altitude Activities to Avoid for 24+ Hours After Diving
Parachute jumping or skydiving
Paragliding
Parasailing
Skiing or snowboarding
Air ballooning
We always recommend reaching out to an individual who has more information about the destination and its altitude. The best thing to do is contact a local PADI Dive Shop and ask them about other activities that you can do safely after diving—such as local food, relaxation, or events.
4. Deep Tissue Massage
What? No massage? Relax and breathe. Here’s the good news – according to the Divers Alert Network (DAN): “Massage has not been confidently associated with…cases of DCS”. Experts caution against deep tissue massage, but a gentle relaxation massage is probably fine. The two main concerns with deep tissue massage are:
Increased blood flow might lead to bubble formation
Muscle soreness which can lead to misdiagnosis (or delayed diagnosis) of decompression sickness (DCS)
The advice is to stay away from deep tissue massages for at least 12 hours after scuba diving.
5. Relaxing in a Hot Tub or Shower
As the body warms up and circulation improves, there is also an increased chance of bubble formation. According to the Divers Alert Network (DAN):
“Since the solubility of gas is inversely related to temperature, tissues will hold less in solution as they warm. Warming tissues with significant gas loads can promote bubble formation.”
When you jump into a hot shower or hot tub straight after a dive—especially a colder dive—the warming up of tissues happens before blood flow increases. In this case, bubbles may form faster than the circulation can remove them harmlessly, creating a higher risk of decompression sickness.
The recommendations for reducing this risk are:
Wait 30 minutes before getting into a hot shower or hot tub to allow your body to warm up slowly
Lower the temperature of your shower or hot tub so your body doesn’t experience such a rapid increase in heat
6. Excessive Drinking
As you are well aware by now, your body requires some time to revert the nitrogen that was absorbed into the blood and tissues. Anything that interferes with the process of elimination of nitrogen from the body should be avoided. If you indulge in drinking alcohol, your body will begin to dehydrate faster—and dehydration increases the risk of decompression sickness (DCS).
Additionally, it becomes difficult to diagnose the symptoms of decompression sickness if you’ve been drinking after diving and are impaired. If you don’t identify symptoms quickly, DCS can be serious.
It’s best not to mix alcohol and scuba diving trips. But if you want to drink alcohol after diving, wait a few hours and hydrate prior.
7. Freediving After Scuba Diving
Dissolved nitrogen isn’t a major concern for casual snorkeling to very shallow depths. But, it is potentially a concern for freedivers who are also scuba divers. Your risk of decompression illness may increase if you freedive after scuba diving. According to the Divers Alert Network (DAN), this is for two reasons:
The physical exertion involved in freediving can increase bubble formation in your body
Bubbles already in your body from scuba diving can shrink under the water pressure and enter the arterial circulation
Depending on the depth and duration of your dives, you might want to enjoy a long surface interval before freediving after scuba diving. If you’re a scuba diver and a freediver, many in the freediving community recommend applying the flying after scuba diving guidelines:
After a single no-stop dive, wait 12 hours before freediving
After multiple no-stop dives or dives over several days, wait 18 hours
After a dive requiring a decompression stop, wait 24 hours
Wait longer if directed by the no-fly time of your dive computer
As a general rule, it is recommended to wait 24 hours before freediving after doing any type of diving. This rule covers all types of dives and adds extra time as a safeguard for peace of mind.
8. Exercising After Diving
Another important rule for scuba divers is to avoid exercise after diving. Physical exertion following scuba diving—particularly the kind that involves heavy use of muscles, joints, or rapid limb movement—could increase the formation of bubbles in the body, which can increase the risk of decompression sickness. Examples of exercise include:
Hitting the gym for weight training
Swimming or running after scuba diving
Playing sports, like beach volleyball or soccer
Even vigorous dancing!
According to the Divers Alert Network (DAN), the consensus among researchers is to wait at least 4-6 hours before exercising after scuba diving. Previously, this guidance was 24 hours, but that is now considered impractical. Of course (as with many other activities on this list), the longer the interval you leave between diving and exercising, the less risk there will be of decompression sickness.
9. Skipping Your Surface Interval
Scuba is undoubtedly addictive. After surfacing from a dive where you’ve been surrounded by bucket-list marine life, like manta rays, sharks, or playful seals, it can be tempting to jump straight back in for a second dive (and a third, or fourth…).
However, your surface interval is non-negotiable. After a dive, you’ll still have nitrogen in your body, and it takes time for this to reduce enough for you to make another dive safely. How long you’ll need to wait depends on the depth and duration of the dive you’ve just completed—as well as the one you plan to do next. In every case, diving without the required surface interval increases your risk of decompression sickness.
Besides, taking a surface interval is the perfect opportunity to explore topside destinations, share stories with your dive buddies, and get some all-important rest and relaxation before your next dive.
10. Ignoring Your Body
After diving, you should pay close attention to how you’re feeling and respond accordingly. Certain signs and symptoms can indicate a serious health issue, and you shouldn’t ignore them. For example, if you experience a rash, numbness, shortness of breath, or dizziness after a dive, you may have decompression sickness (DCS). If you’ve got ear pain after diving, this could be a sign of middle-ear barotrauma or an infection.
Some signs and symptoms of DCS can also be confused with other conditions. For example:
A red rash can look similar to sunburn
A headache after diving can feel like dehydration
Nausea can be a result of seasickness
Fatigue can be mistaken for simply feeling tired after a long day
There may well be nothing to worry about, and you just need to rest and rehydrate—but never ignore what your body is telling you. If something doesn’t feel right, talk to your dive buddy or dive guide, and consider seeking advice from a medical professional.
When becoming a dive professional, apart of diving, there is a lot of theory to study. No matter how experienced you are, there will always come the day that you learn something you did not know yet, or you forgot already.
In diving we often use abbreviations & acronyms to shorten words or to remember them better. Unfortunately, many times neither divers, nor professionals do not actually now what they are standing for. To make sure you know what you are talking about, as following you will find a list of the most common abbreviations and acronyms used in diving:
AAS Alternate Air Source
AB-CABS Cycle of Care: Airway Open? Breathing normally? Chest Compressions / Airway Open / Breathing / Serious Bleeding, Shock, Spinal Injury
ABT Actual Bottom Time
AD Adventure Diver (PADI)
ADT Actual Dive Time
AED Automated External Defribillator
AGE Aterial Gas Embolism
AI Assistant Instructor (PADI)
AOW Advanced Open Water
ATA Atmospheres Absolute
AWARE Aquatic World Awareness, Responsibility and Education
BC Bouyancy Compensator
BCD Buoyancy Control Device
BSAC British Sub-Aqua Club
BT Bottom Time
BWRAF BCD, Weights, Releases, Air, Final o.k.
CAGE Cerebral Arterial Gas Embolism
CCR Closed Circuit Rebreather
CD Course Director
CESA Controlled Emergency Swimming Ascent
CMAS Confederation Moniale Des Activities Subaquatiques
CPR Cardiopulmonary Resuscitation, Chest Compressions
CNS Central Nervous System
DAN Divers Alert Network
DCI Decompression Illness
DCS Decompression Sickness
DEMA Diving Equipment Manufacturers Association
DIN Deutsches Insitut Fuer Normung
DIR Doing It Right
DM Divemaster (PADI)
DMT Divemaster Trainee
DPV Diver Propulsion Vehicle
DSD Discover Scuba Diving (PADI)
DSMB Delayed Surface Marker Buoy
DV Demand Valve
EAN(X) Enriched Air Nitrox
EAR Expired Air Resuscitation
EFR Emergency First Response
EMS Emergency Medical Services
END Equivalent Narcotic Depth
eRDP electronic Recrational Dive Planner
FAST Help to identify if a patient is having a stroke: Face, Arms, Speech, Time
HP High Pressure
HPNS High Pressure Nervous Syndrome
IAND International Association Of Nitrox Divers
IDC Instructor Development Course (PADI)
IDC Staff Instr Instructor Development Course Staff Instructor (PADI)
LAT Lowest Astonomical Tide
LP Low Pressure
LPI Low Pressure Inflator
MDT Maximum Dive Time
MI Master instructor
MOD Maximum Operating Depth
MSD Master Scuba Diver (PADI)
MSDT Master Scuba Diver Trainer (PADI)
NAUI National Association Of Underwater Instructors
NDL No Decompression Limit
NITROX Any Gas Mixture Of Nitrogen And Oxygen; Though Most Commonly Used For Oxygen Mixtures Above The Normal 21 Per Cent.
OW(D) Open Water (Diver) (PADI)
OWSI Open Water Scuba Instructor (PADI)
OTU Oxygen Toxicity Unit – One OTU is earned by breathing 100% oxygen at one bar for one minute
PADI Professional Association Of Diving Instructors
PIC Positive Identification Card (PADI)
PG Pressure Group
PP Partial Pressure
PPB Peak Performance Bouyancy
PSI Pounds Per Square Inch
RD Rescue Diver (PADI)
RDP Recreational Dive Planner
Resc Rescue
RIB Rigid-Hulled Inflatable Boat
RNT Residual Nitrogen Time
RSTC Recreational Scuba Training Council. Organization That Sets Basic Guidelines For Scuba Diving Agencies
RYA Royal Yachting Association
SAC Surface Air Consumption (in liters pe rminute)
SAMPLE Signs & Symptoms / Allergies / Medications / Preexisting Medical / Conditions / Last Meal / Events
SCUBA Self Contained Underwater Breathing Aparatus
SDI Scuba Diving International
SI Surface Interval
SMB Surface Marker Buoy
SPG Submerssible Pressure Guage
SSI Scuba Schools International; Diving Instruction Organization
SORTED Signal, Orientation, Regulator, Time, Elevate, Descend
STELLA Signal, Time, Elevate, Look, Listen, Ascend
TDI Technical Diving International
TDT Total Dive Time
TNT Total Nitrogen Time
TP Test Pressure
VENTID Vision Ears Nausea Twitiching Irritation Dizziness
VGE Venous Gas Embolism
Diving Signals
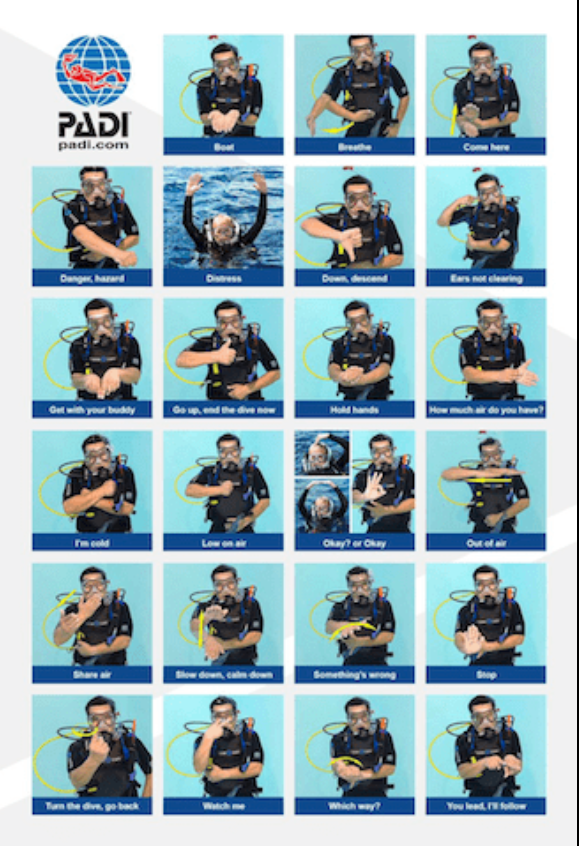
Why Learn Marine Life Hand Signals?
If your buddy is grinning and pointing frantically into the blue, you probably already know there’s a bucket-list marine life encounter on the cards. However, knowing and recognizing the correct hand signals for different underwater creatures can still be pretty helpful during your dives. After all, a camouflaged stonefish or tiny nudibranch is much easier to spot once you know what creature your buddy is pointing out—and new divers will especially appreciate being taught which marine species they’re looking at (as well as what hazards to steer clear of!)
In addition to helping scuba divers communicate underwater, using hand signals for marine life while on the surface can also be a great way to teach kids about the ocean!
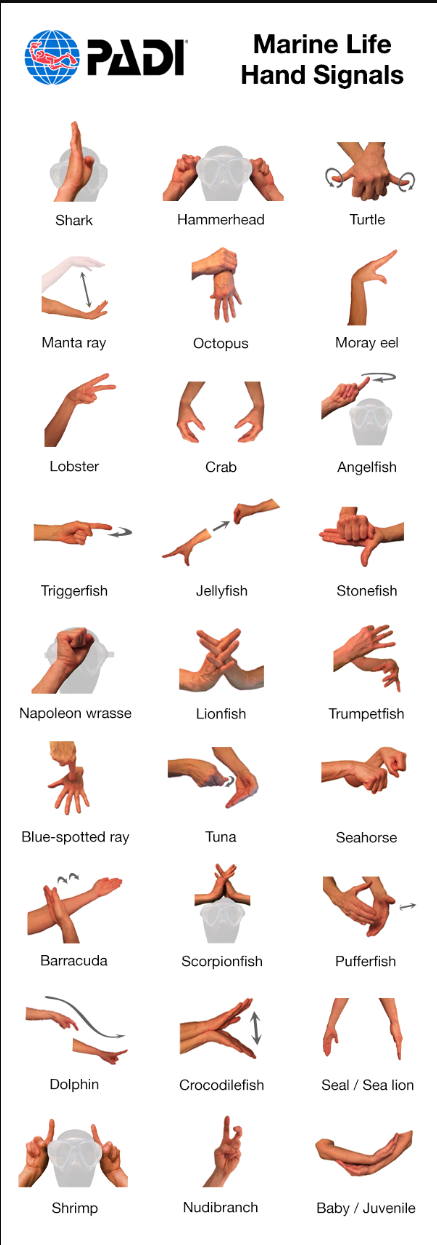
Marine Life Hand Signals
Mammals, Turtles, Sharks, and Rays
Shark: Hold the side of your hand against your forehead
Hammerhead: Place your fists on either side of your head
Manta ray: Flap both of your arms like you’re flying
Blue-spotted ray: Use your finger to tap random points on the back of your other hand
Dolphin: Ripple and move your index finger to mimic the way a dolphin swims
Seal / Sea lion: Make a clapping motion with both of your arms extended
Turtle: Place one hand on top of the other and rotate your thumbs
Crustaceans and Critters
Octopus: Wiggle your downturned fingers like they’re tentacles
Seahorse: Move both hands up and down like you’re riding a hobby horse
Moray eel: Tap the fingers and thumb of one hand together
Crab: The same as for moray eel, but do it with both hands turned sideways
Lobster: Do a scissor-like motion with your index and middle finger, on both hands
Shrimp: Point your index fingers upwards on either side of your forehead
Nudibranch: Create a “v” shape with your fingers and wiggle the ends
Jellyfish: Move your hand while opening and closing your fingers like tentacles
Other Fish
Stonefish: Make a fist and place it on the palm of your other hand
Napoleon wrasse: Hold your fist against your forehead
Lionfish: Interlock your fingers and wiggle them
Scorpionfish: Like lionfish, but put your hands on top of your head
Trumpetfish: Hold and move your fingers like you’re playing the trumpet
Tuna: Create a turning motion with one hand against the other, as if you’re opening a can
Barracuda: With one hand, do a chopping motion along your other arm
Angelfish: Draw a hoop (halo) shape above your head with your finger
Triggerfish: Point and bend your index finger, similar to pulling a trigger
Pufferfish: Clasp your hands and move them toward and away from each other
Crocodilefish: Put your palms together, then open and close them at the fingertips
And Finally…
Juvenile (baby): Add a cradling motion before the regular hand signal to indicate a juvenile
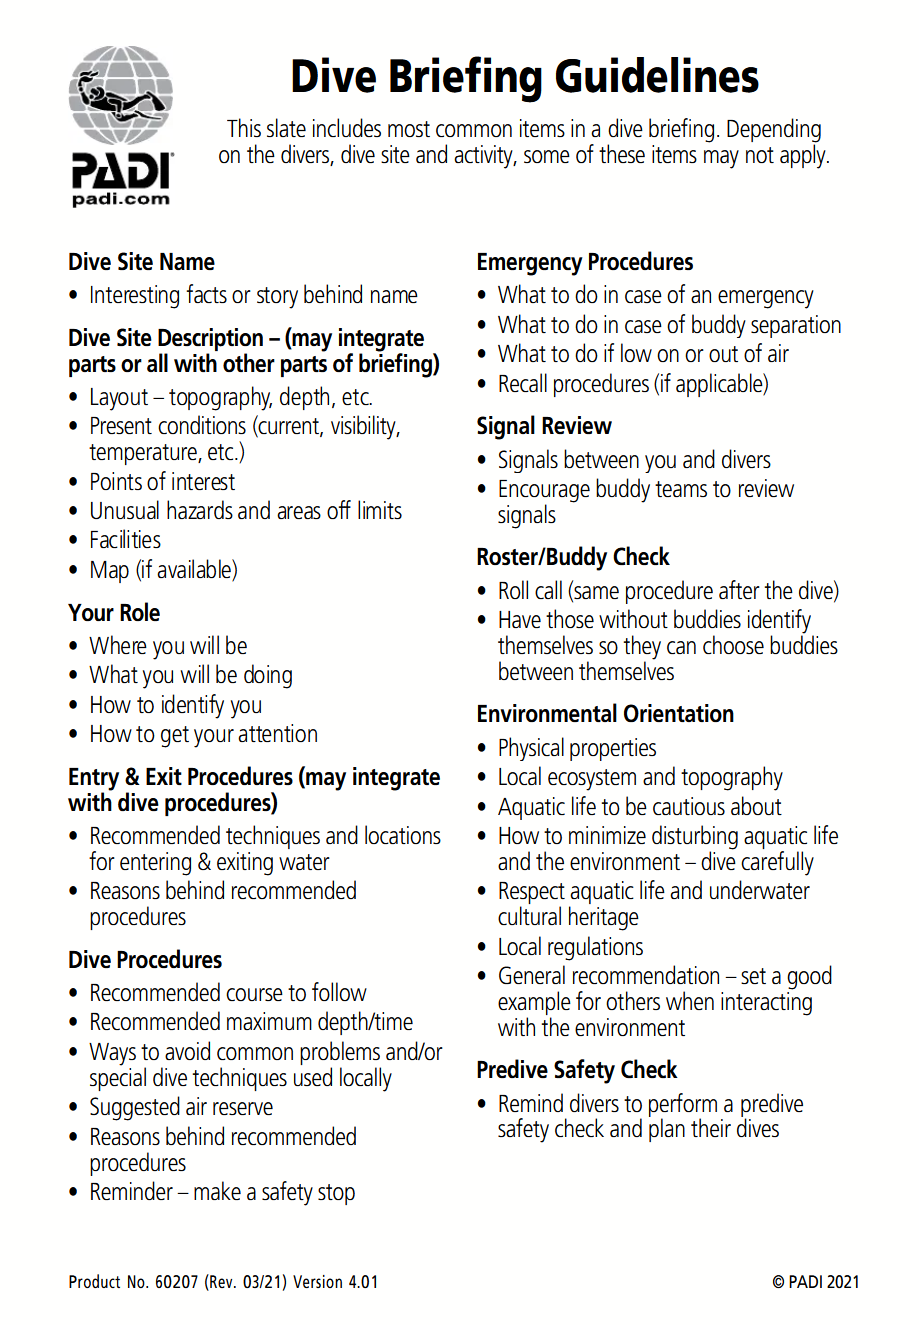
What is a briefing?
A briefing, in the world of diving, consists of a brief pre-dive explanation about the same or about the activity that is going to be carried out. Generally, following the PADI method, the following 10 points are covered:
Name of the dive site: at this point you can include some facts and anecdotes about the place.
Description of the dive site: includes the topography, depth, conditions (current, visibility, temperature), as well as points of interest or risk areas.
Role of the guide: it is important to know where you are going to be located, what you are going to be doing, how to identify it and how to capture its attention.
Entry and Exit Procedures: We need to clarify entry and exit techniques and points.
Dive Procedures: These include the course, max depth, air reserve, safety stop, and any special techniques we are going to use.
Emergency procedures: all divers must know what to do in an emergency (shortness of breath, losing a buddy…). In addition, a procedure must be established to call all divers if necessary.
Cue review: This way we make sure that the whole group remembers and uses the same cues.
Buddy Check: Make sure your gear is complete, both before and after the dive, and set up a buddy system.
PADI slates
Orientation about the environment: it is advisable to inform about the environmental characteristics of the dive site (flora and fauna) and remind divers that they must follow the rules of safe diving to minimize the disturbance of the environment.
Safety check: Remind divers to carry out a pre-dive safety check. To remember everything that we must review, we usually use the acronym CPTAO (Vest, Leads, Strips, Air, Okay)
How can it help me?
The main function of the briefing is to increase safety. This is achieved by giving us information prior to the dive that allows us to get an idea of what we are going to find underwater and what the methodology that we are going to follow is going to be.
Also, having protocols in place, especially in emergencies, decreases reaction time, which increases the chances of a successful outcome.
On the other hand, these pre-dive talks help us find points of interest during the dive and enjoy it more while being more relaxed. In addition, knowing more about the dive you are going to do makes it more interesting, since it allows us to see things that on other occasions we would have ignored and ensures that all divers know the route, allowing us to meet if necessary.
Divesite map
During the briefings you can also go over signs or any concerns that we have about diving.
General Queries
- Operating Hours
- Contact Us
- Payment Method
- Servicing Diving Gear?
- Do You Sell diving gear?
- Cancellation Policy
- Why is Khorfakkan Famous?
- Which Ocean does khorfakkan look at?
- Is khorfakkan good for Scuba Diving?
- Things to pack for diving
Nitrox eRDPml
- eRDP
- Nitrox eRDPml
PADI Theory - Physics
- Physics
PADI Theory - Physiology
- Physiology
PADI Theory - Equipment
- Cylinders
- Cylinder Valve
PADI Theory - Dive Skills
- Buoyancy – Proper Weighting Skills
PADI Theory - Environment
- 10 Tips to Save the Ocean
- What is Dive Against Debris?
Think Like a Diver
- The Proper Dive Buddy Check – How Do You Say BWRAF?
- Rules Every Diver Should Follow
- Top 10 Scuba Diving Rules
- 10 Things You Should Never Do Immediately After Diving
- Most Important Scuba Diving Abbreviations & Acronyms
- Diving Signals
- Marine Life Hand Signals
- Dive Briefing
- Boat Diving Guidelines
Emergency First Response
- What is Emergency First Response (EFR) ?
- Who can take an Emergency First Response provider course?
- What is an AED and why would I want to learn about it?
- How often must I refresh my skills?
- What the Emergency First Response Course Covers?
Rescue
- What Is the PADI Rescue Diver Course?
- What Does a Rescue Diver Actually Do?
- How Hard Is It To Become a Rescue Diver?
- What Prerequisites Do I Need To Take Part in a PADI Rescue Diver Course?
- How Many Dives Does It Take To Become a Rescue Diver?
- What Skills Do You Learn During the Rescue Diver Course?
- Why Do I Need First Aid Training To Do the Rescue Diver Course?
- Do I Really Need To Become a Rescue Diver? Is It Worth Taking the Course?
DAN Insurance
- Long term Dan Insurance Plan
- Short Term Dan Insurance Plan
Certification
- How long does it take to complete a course?
- Do I need to prepay for a course or fun dive?
- How much time do I need to dedicate to eLearning?
- Does my course expire?
- Do I need to know how to swim?
- Do I need medical clearance to dive?
- Can I Fly after diving?
- When do I need to take a refresher (ReActivate) session after a period of activity?
- What should I bring when I come diving?
- How long will it take for my certification to be processed?
- Can I scuba dive without certification?
- How deep can I go with my PADI certification or experience?
- Can I dive with a PADI certification anywhere in the world?
- Does PADI certification expire?
- Will I receive a plastic certification card?
- Continue Education